grpc-node 源码阅读笔记[0]
简单介绍 gRPC
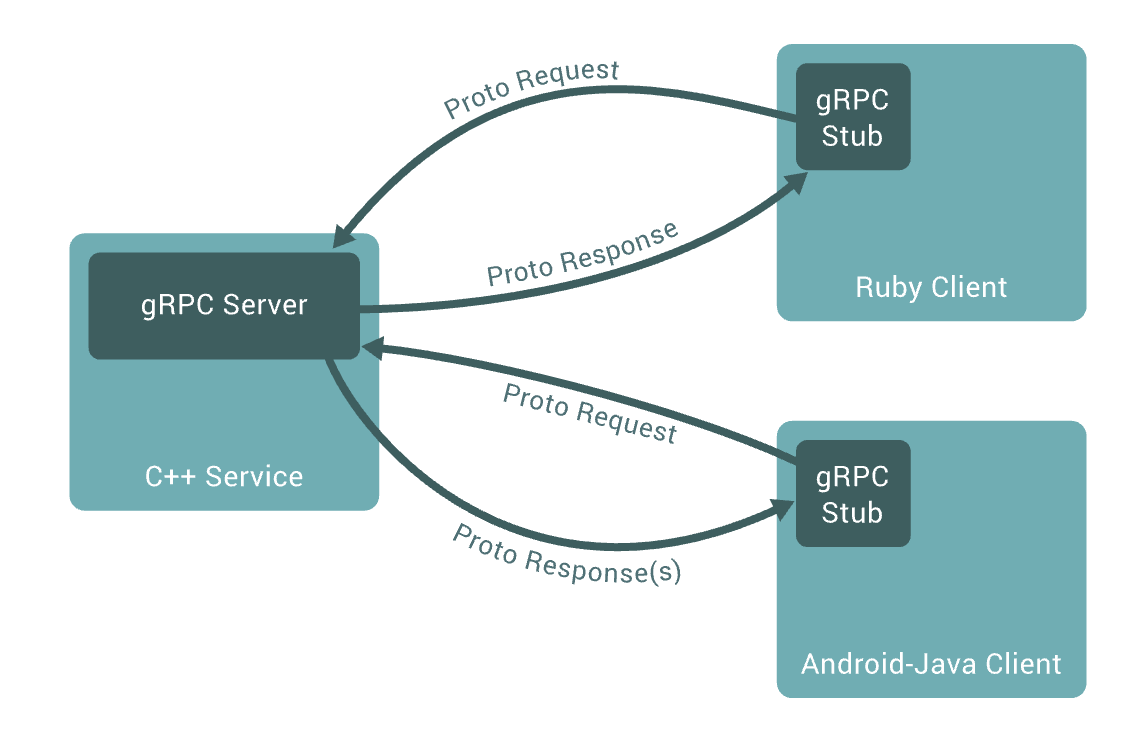
贴一张挂在官网的图片:https://grpc.io/docs/what-is-grpc/introduction/

可以理解 gRPC 是 RPC(远程过程调用)框架的一种实现,关于 RPC 的介绍因为并不是本次的主题,所以放个链接来帮助大家理解:https://www.zhihu.com/question/25536695
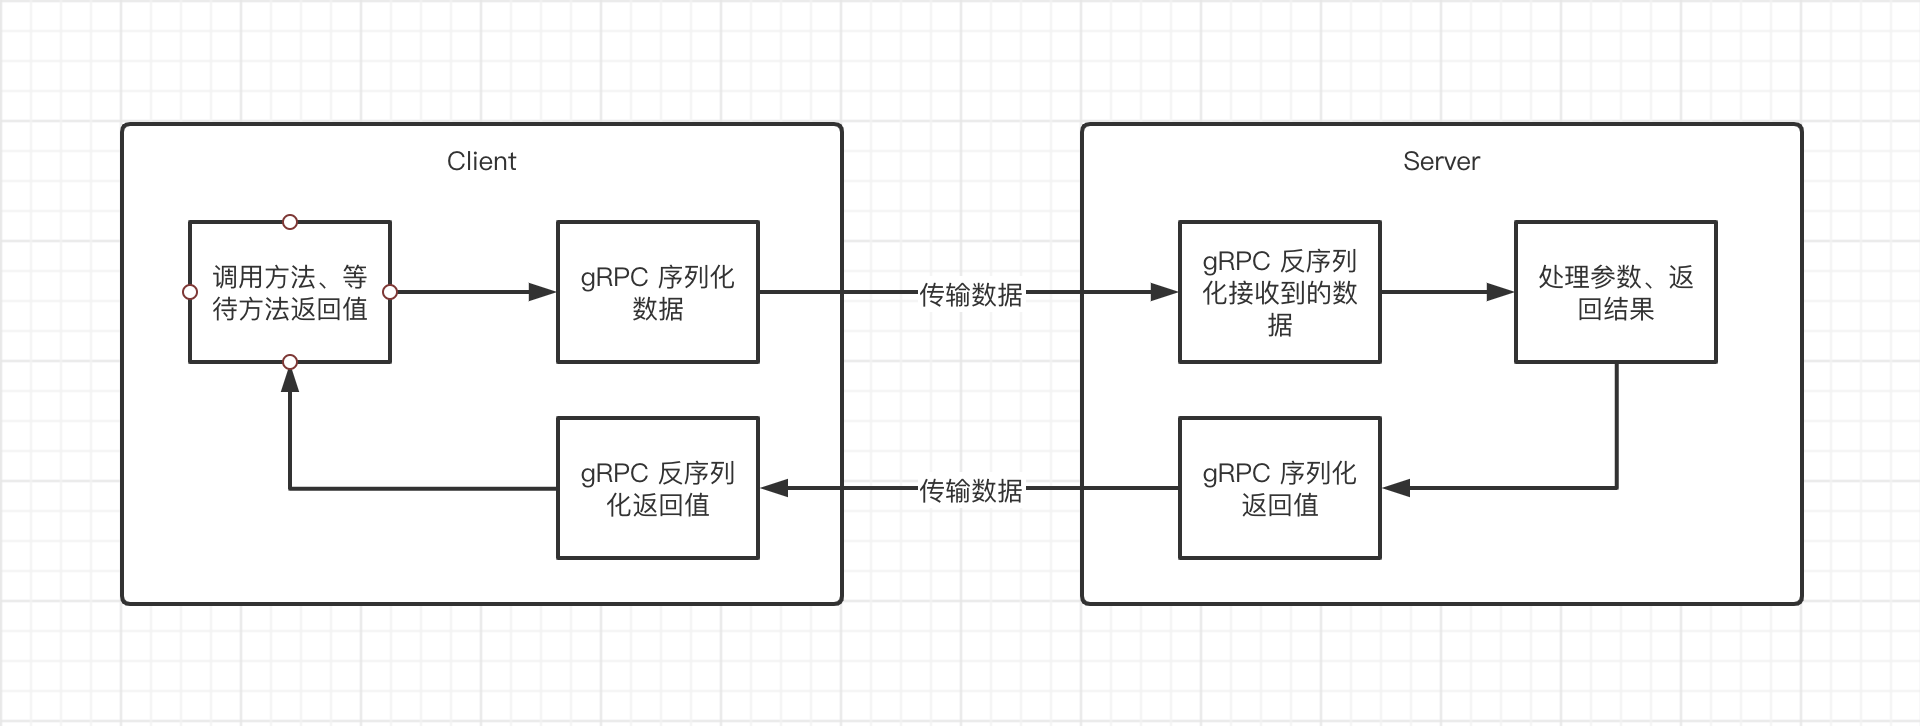
我所理解 RPC 整个执行的过程就是 Client 调用方法 -> 序列化请求参数 -> 传输数据 -> 反序列化请求参数 -> Server 处理请求 -> 序列化返回数据 -> 传输数据 -> Client 接收到方法返回值:

其主要逻辑会集中在 数据的序列化/反序列化 以及 数据的传输上,而这两项 gRPC 分别选用了 Protocol Buffers 和 HTTP2 来作为默认选项。
gRPC 在 Node.js 的实现
gRPC 在 Node.js 的实现上一共有两个官方版本,一个是基于 c++ addon 的版本,另一个是纯 JS 实现的版本。
gRPC 在 Node.js 中相关的模块
除了上边提到的两个 gRPC 的实现,在 Node.js 中还存在一些其他的模块用来辅助使用 gRPC。
- grpc-tools 这个是每个语言都会用的,用来根据 proto 文件生成对应,插件提供了 Node.js 语言的实现
- proto-loader 用来动态加载 proto 文件,不需要使用 grpc_tools 提前生成代码(性能比上边的方式稍差)
这次笔记主要是针对 grpc-node 方式的实现,在 c++ addon 模块的实现下,并不是一个 gRPC 的完整实现,做的事情更多的是一个衔接的工作,通过 JS、c++ 两层封装将 c++ 版本的 gRPC 能力暴露出来供用户使用。
之所以选择它是因为觉得逻辑会较 grpc-js 清晰一些,更适合理解 gRPC 整体的运行逻辑。
在项目仓库中,两个目录下是我们需要关注的:
- src(JS 代码)
- ext(c++ 代码)
ext 中的代码主要用于调用 c++ 版本 gRPC 的接口,并通过 NAN 提供 c++ addon 模块。
src 中的代码则是调用了 ext 编译后的模块,并进行一层应用上的封装。
而作为使用 gRPC 的用户就是引用的 src 下的文件了。
我们先通过官方的 hello world 示例来说明我们是如何使用 gRPC 的,因为 gRPC 默认的数据序列化方式采用的 protobuf,所以首先我们需要有一个 proto 文件,然后通过 gRPC 提供的文件来生成对应的代码,生成出来的文件包含了 proto 中所定义的 service、method、message 等各种结构的定义,并能够让我们用比较熟悉的方式去使用。
示例中的 proto 文件:
package helloworld;

// The greeting service definition.
service Greeter {
  // Sends a greeting
  rpc SayHello (HelloRequest) returns (HelloReply) {}
}

// The request message containing the user's name.
message HelloRequest {
  string name = 1;
}

// The response message containing the greetings
message HelloReply {
  string message = 1;
}
grpc_tools 是用来生成 proto 对应代码的,这个命令行工具提供了多种语言的生成版本。
在 Node 中,会生成两个文件,一般命名规则为 xxx_pb.js、xxx_grpc_pb.js,xxx_pb.js 是 proto 中各种 service、method 以及 message 的结构描述及如何使用的接口定义,而 xxx_grpc_pb.js 主要则是针对 xxx_pb.js 的一个整合,按照 proto 文件中定义的结构生成对应的代码,在用户使用的时候,使用前者多半用于构造消息结构,使用后者则是方法的调用。
生成后的关键代码(XXX_grpc_pb.js):
const grpc = require('@grpc/grpc');
const helloworld_pb = require('./helloworld_pb.js');

function serialize_helloworld_HelloReply(arg) {
  if (!(arg instanceof helloworld_pb.HelloReply)) {
    throw new Error('Expected argument of type helloworld.HelloReply');
  }
  return Buffer.from(arg.serializeBinary());
}

function deserialize_helloworld_HelloReply(buffer_arg) {
  return helloworld_pb.HelloReply.deserializeBinary(new Uint8Array(buffer_arg));
}

function serialize_helloworld_HelloRequest(arg) {
  if (!(arg instanceof helloworld_pb.HelloRequest)) {
    throw new Error('Expected argument of type helloworld.HelloRequest');
  }
  return Buffer.from(arg.serializeBinary());
}

function deserialize_helloworld_HelloRequest(buffer_arg) {
  return helloworld_pb.HelloRequest.deserializeBinary(new Uint8Array(buffer_arg));
}


// The greeting service definition.
const GreeterService = exports.GreeterService = {
  // Sends a greeting
sayHello: {
    path: '/helloworld.Greeter/SayHello',
    requestStream: false,
    responseStream: false,
    requestType: helloworld_pb.HelloRequest,
    responseType: helloworld_pb.HelloReply,
    requestSerialize: serialize_helloworld_HelloRequest,
    requestDeserialize: deserialize_helloworld_HelloRequest,
    responseSerialize: serialize_helloworld_HelloReply,
    responseDeserialize: deserialize_helloworld_HelloReply,
  },
};

exports.GreeterClient = grpc.makeGenericClientConstructor(GreeterService);
最终导出的 sayHello 就是我们在 proto 文件中定义的 SayHello 方法,所以我们在作为 Client 的时候使用,就是很简单的调用 sayHello 就行了:
const messages = require('./helloworld_pb');
const services = require('./helloworld_grpc_pb');
const grpc = require('grpc');

const client = new services.GreeterClient(
  target,
  grpc.credentials.createInsecure()
);

const request = new messages.HelloRequest();

request.setName('Niko');

client.sayHello(request, function(err, response) {
  console.log('Greeting:', response.getMessage());
});
其实真实写的代码也就上边的几行,实例化了一个 Client,实例化一个 Message 并构建数据,然后通过 client 调用对应的 method 传入 message,就完成了一个 gRPC 请求的发送。
在这个过程中,我们直接可见的用到了 grpc-node 的 credentials 以及 makeGenericClientConstructor,我们就拿这两个作为入口,首先从 makeGenericClientConstructor 来说。
源码分析
makeGenericClientConstructor
在翻看 index.js 文件中可以发现, makeGenericClientConstructor 其实是 client.makeClientConstructor 的一个别名,所以我们需要去查看 src/client.js 中对应函数的定义,就像函数名一样,它是用来生成一个 Client 的构造函数的,这个构造函数就是我们在上边示例中的 GreeterClient。
源码所在位置: https://github.com/grpc/grpc-node/blob/grpc%401.24.x/packages/grpc-native-core/src/client.js#L979
当对照着 xxx_grpc_pb.js 与源码来看时,会发现调用函数只传入了一个参数,而函数定义却存在三个参数,这个其实是历史原因导致的,我们可以直接忽略后边的两个参数。
精简后的源码:
exports.makeClientConstructor = function(methods) {
  function ServiceClient(address, credentials, options) {
    Client.call(this, address, credentials, options);
  }

  util.inherits(ServiceClient, Client);
  ServiceClient.prototype.$method_definitions = methods;
  ServiceClient.prototype.$method_names = {};

  Object.keys(methods).forEach(name => {
    const attrs = methods[name];
    if (name.indexOf('$') === 0) {
      throw new Error('Method names cannot start with $');
    }
    var method_type = common.getMethodType(attrs);
    var method_func = function() {
      return requester_funcs[method_type].apply(this,
        [ attrs.path, attrs.requestSerialize, attrs.responseDeserialize ]
        .concat([].slice.call(arguments))
      );
    };

    ServiceClient.prototype[name] = method_func;
    ServiceClient.prototype.$method_names[attrs.path] = name;
    // Associate all provided attributes with the method
    Object.assign(ServiceClient.prototype[name], attrs);
    if (attrs.originalName) {
      ServiceClient.prototype[attrs.originalName] =
        ServiceClient.prototype[name];
    }
  });

  ServiceClient.service = methods;

  return ServiceClient;
};
methods 参数就是我们上边文件中生成的对象,包括服务地址、是否使用 stream、以及 请求/返回值 的类型及对应的序列化/反序列化 方式。
大致的逻辑就是创建一个继承自 Client 的子类,然后遍历我们整个 service 来看里边有多少个 method,并根据 method 不同的传输类型来区分使用不同的函数进行数据的传输,最后以 method 为 key 放到 Client 子类的原型链上。
common.getMethodType 就是用来区分 method 究竟是什么类型的请求的,目前 gRPC 一共分了四种类型,双向 Stream、两个单向 Stream,以及 Unary 模式:
exports.getMethodType = function(method_definition) {
  if (method_definition.requestStream) {
    if (method_definition.responseStream) {
      return constants.methodTypes.BIDI_STREAMING;
    } else {
      return constants.methodTypes.CLIENT_STREAMING;
    }
  } else {
    if (method_definition.responseStream) {
      return constants.methodTypes.SERVER_STREAMING;
    } else {
      return constants.methodTypes.UNARY;
    }
  }
};
在最后几行有一处判断 originalName 是否存在的操作,这个是在 proto-loader 中存在的一个逻辑,将 methodName 转换成纯小写放了进去,单纯看注释的话,这并不是一个长期的解决方案: https://github.com/grpc/grpc-node/blob/master/packages/proto-loader/src/index.ts#L193
P.S. proto-loader 是 JS 里边一种动态加载 proto 文件的方式,性能比通过 grpc_tools 预生成代码的方式要低一些。
所有的请求方式,都被放在了一个叫做 requester_funcs 的对象中,源码中的定义是这样的:
var requester_funcs = {
  [methodTypes.UNARY]: Client.prototype.makeUnaryRequest,
  [methodTypes.CLIENT_STREAMING]: Client.prototype.makeClientStreamRequest,
  [methodTypes.SERVER_STREAMING]: Client.prototype.makeServerStreamRequest,
  [methodTypes.BIDI_STREAMING]: Client.prototype.makeBidiStreamRequest
};
从这里就可以看出,其实是和我们 getMethodType 所对应的四种处理方式。
最终,将继承自 Client 的子类返回,完成了整个函数的执行。
Client
首先我们需要看看继承的 Client 构造函数究竟做了什么事情。
抛开参数类型的检查,首先是针对拦截器的处理,我们可以通过两种方式来实现拦截器,一个是提供拦截器的具体函数,这个在所有 method 触发时都会执行,还有一个可以通过传入 interceptor_provider 来实现动态的生成拦截器,函数会在初始化 Client 的时候触发,并要求返回一个新的 interceptor 对象用于执行拦截器的逻辑。
interceptor 的用法
// interceptors 用法
const interceptor = function(options, nextCall) {
  console.log('trigger')
  return new InterceptingCall(nextCall(options));
}
const client = new services.GreeterClient(
  target,
  grpc.credentials.createInsecure(),
  {
    interceptors: [interceptor]
  }
);

// interceptor_providers 用法
const interceptor = function(options, nextCall) {
  console.log('trigger')
  return new InterceptingCall(nextCall(options));
}

const interceptorProvider = (methodDefinition) => {
  console.log('call interceptorProvider', methodDefinition)
  return interceptor
}

const client = new services.GreeterClient(
  target,
  grpc.credentials.createInsecure(),
  {
    interceptor_providers: [interceptorProvider]
  }
);
P.S. 需要注意的是,如果传入 interceptor_providers,则会在两个地方触发调用,一个是实例化 Client 的时候,还有一个是在 method 真实调用的时候,每次调用都会触发,所以如果要复用 interceptor,最好在函数之外构建出函数体
但是这样的拦截器其实是没有太多意义的,我们不能够针对 metadata、message 来做自己的修改,如果我们观察 InterceptingCall 的具体函数签名,会发现它支持两个参数的传入。
function InterceptingCall(next_call, requester) {
  this.next_call = next_call;
  this.requester = requester;
}
上边示例只介绍了第一个参数,这个参数预期接受一个对象,对象会提供多个方法,我们可以通过console.log(nextCall(options).constructor.prototype)来查看都有哪些,例如 sendMessage、start 之类的。
而观察这些函数的实现,会发现他们都调用了一个 _callNext。
InterceptingCall.prototype.sendMessage = function(message) {
  this._callNext('sendMessage', [message]);
};

InterceptingCall.prototype.halfClose = function() {
  this._callNext('halfClose');
};

InterceptingCall.prototype.cancel = function() {
  this._callNext('cancel');
};

InterceptingCall.prototype._callNext = function(method_name, args, next) {
  var args_array = args || [];
  var next_call = next ? next : this._getNextCall(method_name);
  if (this.requester && this.requester[method_name]) {
    // Avoid using expensive `apply` calls
    var num_args = args_array.length;
    switch (num_args) {
      case 0:
        return this.requester[method_name](next_call);
      case 1:
        return this.requester[method_name](args_array[0], next_call);
      case 2:
        return this.requester[method_name](args_array[0], args_array[1],
                                           next_call);
    }
  } else {
    if (next_call === emptyNext) {
      throw new Error('Interceptor call chain terminated unexpectedly');
    }
    return next_call(args_array[0], args_array[1]);
  }
};
在 _callNext 方法中,我们就可以找到 requester 参数究竟是有什么用了,如果 requester 也有实现对应的 method_name,那么就会先执行 requester 的方法,随后将 next_call 对应的方法作为调用 requester 方法的最后一个参数传入。
在 grpc-node 中,拦截器的执行顺序与传入顺序有关,是一个队列,先传入的拦截器先执行,如果传入了第二个参数,则先执行第二个参数对应的方法,后执行第一个参数对应的方法。
所以如果我们想做一些额外的事情,比如说针对 metadata 添加一个我们想要的字段,那么就可以这么来写拦截器:
var interceptor = function(options, nextCall) {
  return new InterceptingCall(nextCall(options), {
    start: function(metadata, listener, next) {
      next(metadata, {
        onReceiveMetadata: function (metadata, next) {
          metadata.set('xxx', 'xxx')
          next(metadata);
        },
      });
     },
  });
};
稍微特殊的地方是,
start函数的next参数被调用时传入的第二个参数并不是一个InterceptingCall的实例,而是一个InterceptingListener的实例,两者都有_callNext的实现,只不过所提供的方法不完全一样罢了。
Channel 的创建
接下来的代码逻辑主要是用于创建 Channel,可以通过传递不同的参数来覆盖 Channel,也可以用默认的 Channel,这个 Channel 对应的 gRPC 中其实就是做数据传输的那一个模块,可以理解为 HTTP2 最终是在这里使用的。
一般很少会去覆盖默认的 Channel,所以我们直接去看 grpc-node 里边的 Channel 是如何实现的。
Channel 是 c++ 代码实现的,代码的位置: https://github.com/grpc/grpc-node/blob/grpc%401.24.x/packages/grpc-native-core/ext/channel.cc#L206
如果有同学尝试过混用 grpc-node 和 grpc-js,那么你一定有看到过这个报错:Channel's second argument (credentials) must be a ChannelCredentials
原因就在于 Channel 实例化过程中会进行检查我们创建 Channel 传入的 credential 是否是继承自 grpc 中的 ChannelCredentials 类。
而 grpc-node 和 grpc-js 用的是两个不同的类,所以混用的话可能会出现这个问题。
然后就是根据传入的 credential 的不同来判断是否要使用加密,而一般常用的 grpc.credentials.createInsecure() 其实就是不走加密的意思了,我们可以在 https://github.com/grpc/grpc-node/blob/grpc%401.24.x/packages/grpc-native-core/ext/channel_credentials.cc#L248 和 https://github.com/grpc/grpc-node/blob/grpc%401.24.x/packages/grpc-native-core/ext/channel.cc#L230 来看到对应的逻辑。
后边就是调用 c++ 版本的 grpc 来构建对应的 Channel 了,如果有老铁看过 c++ 版本是如何创建 grpc Client 的,那么这些代码就比较熟悉了: https://github.com/grpc/grpc/blob/master/examples/cpp/helloworld/greeter_client.cc#L100
在 grpc-node 中也是调用的同样的 API 来创建的。
makeUnaryRequest
当 Client 被创建出来后,我们会调用 Client 上的方法(也就是发请求了),这时候就会触发到上边提到的 requester_funcs 其中的一个,我们先从最简单的 Unary 来说,这种 Client/Server 都是 Unary 请求方式时会触发的函数。
我们通过上边 method_func 中调用方式可以确定传递了什么参数进去,有几个固定的参数 path、request 序列化方式,以及 response 的反序列化方式。
后边的参数就是由调用时传入的动态参数了,这些可以在 makeUnaryRequest 函数定义中看到,分别是 argument(也就是 request body)、metadata(可以理解为 header,一些元数据)、options 是一个可选的参数(自定义的拦截器是放在这里的),可以用于覆盖 method 的一些描述信息,以及最后的 callback 就是我们接收到 response 后应该做的操作了。
整个函数的实现,按长度来说,有一半都是在处理参数,而剩下的部分则做了两件事,一个是实例化了 ClientUnaryCall 对象,另一个则是处理拦截器相关的逻辑,并启动拦截器来发送整个请求。
在 makeUnaryRequest 函数中涉及到拦截器的部分有这么几块 resolveInterceptorProviders、getLastListener与getInterceptingCall。
ClientUnaryCall
先来看 ClientUnaryCall 做了什么事情,在源码中有这样的一个代码块,是使用该对象的场景:
function ClientUnaryCall(call) {
  EventEmitter.call(this);
  this.call = call;
}

var callProperties = {
  argument: argument,
  metadata: metadata,
  call: new ClientUnaryCall(),
  channel: this.$channel,
  methodDefinition: method_definition,
  callOptions: options,
  callback: callback
};

// 以及后续与拦截器产生了一些关联
var emitter = callProperties.call;
// 这行代码很诡异,看起来是可以在实例化的时候传入的,却选择了在这里覆盖属性值
emitter.call = intercepting_call;

var last_listener = client_interceptors.getLastListener(
  methodDefinition,
  emitter,
  callProperties.callback
);
关于 ClientUnaryCall 的定义也非常简单,其实是一个继承自 EventEmitter 的子类,增加了一个 call 属性的定义,以及两个方法封装调用了 call 属性对应的一些方法。
强烈怀疑 这部分代码是后期有过调整,因为 ClientUnaryCall 构造函数的实现中是可以接受一个参数作为 call 属性的赋值的,然而在代码应用中选择了后续覆盖 call 属性,而非直接在实例化的时候传入进去
resolveInterceptorProviders
resolveInterceptorProviders 是用来处理用户传入的拦截器的,这个函数在 Client 的整个生命周期会有两处调用,一个是在上边 Client 实例化的过程中会触发一次,再有就是每次 method 被调用之前,会重新触发该函数。resolveInterceptorProviders 的逻辑很简单,就是遍历我们传入的 interceptor_provider 并将对应 method 的信息描述传入并执行,得到 provider 返回的 interceptor 用作拦截器。
在 Client 实例化过程中是会遍历所有的 method 来执行,而在具体的 method 触发时则只触发当前 method 相关的 provider 逻辑。
getLastListener
getLastListener 按照注释中的描述,是为了获得一个最后会触发的监听者,源码大致是这样的:
https://github.com/grpc/grpc-node/blob/grpc%401.24.x/packages/grpc-native-core/src/client_interceptors.js#L1337
var listenerGenerators = {
  [methodTypes.UNARY]: _getUnaryListener,
  [methodTypes.CLIENT_STREAMING]: _getClientStreamingListener,
  [methodTypes.SERVER_STREAMING]: _getServerStreamingListener,
  [methodTypes.BIDI_STREAMING]: _getBidiStreamingListener
};

function getLastListener(method_definition, emitter, callback) {
  if (emitter instanceof Function) {
    callback = emitter;
    callback = function() {};
  }
  if (!(callback instanceof Function)) {
    callback = function() {};
  }
  if (!((emitter instanceof EventEmitter) &&
       (callback instanceof Function))) {
    throw new Error('Argument mismatch in getLastListener');
  }
  var method_type = common.getMethodType(method_definition);
  var generator = listenerGenerators[method_type];
  return generator(method_definition, emitter, callback);
}
同样也使用了一个枚举来区分不同的方法类型来调用不同的函数来生成对应的 listener。
比如这里用到的 getUnaryListener,是这样的一个逻辑:
function _getUnaryListener(method_definition, emitter, callback) {
  var resultMessage;
  return {
    onReceiveMetadata: function (metadata) {
      emitter.emit('metadata', metadata);
    },
    onReceiveMessage: function (message) {
      resultMessage = message;
    },
    onReceiveStatus: function (status) {
      if (status.code !== constants.status.OK) {
        var error = common.createStatusError(status);
        callback(error);
      } else {
        callback(null, resultMessage);
      }
      emitter.emit('status', status);
    }
  };
}
代码也算比较清晰,在不同的阶段会触发不同的事件,然后再真正返回结果以后,触发 callback 来告知用户请求响应。
也就是我们在示例中调用 sayHello 时传入的 callback 被调用的地方了。
getInterceptingCall
getInterceptingCall 函数的调用会返回一个实例,通过操作该实例我们可以控制请求的开始、数据的发送以及请求的结束。
我们上边 getLastListener 返回的对象触发的时机也是会在这里可以找到的。
从源码上来看会涉及到这么几个函数:
var interceptorGenerators = {
  [methodTypes.UNARY]: _getUnaryInterceptor,
  [methodTypes.CLIENT_STREAMING]: _getClientStreamingInterceptor,
  [methodTypes.SERVER_STREAMING]: _getServerStreamingInterceptor,
  [methodTypes.BIDI_STREAMING]: _getBidiStreamingInterceptor
};

function getInterceptingCall(method_definition, options,
                             interceptors, channel, responder) {
  var last_interceptor = _getLastInterceptor(method_definition, channel,
                                            responder);
  var all_interceptors = interceptors.concat(last_interceptor);
  return _buildChain(all_interceptors, options);
}

function _getLastInterceptor(method_definition, channel, responder) {
  var callback = (responder instanceof Function) ? responder : function() {};
  var emitter = (responder instanceof EventEmitter) ? responder :
                                                      new EventEmitter();
  var method_type = common.getMethodType(method_definition);
  var generator = interceptorGenerators[method_type];
  return generator(method_definition, channel, emitter, callback);
}

function _buildChain(interceptors, options) {
  var next = function(interceptors) {
    if (interceptors.length === 0) {
      return function (options) {};
    }
    var head_interceptor = interceptors[0];
    var rest_interceptors = interceptors.slice(1);
    return function (options) {
      return head_interceptor(options, next(rest_interceptors));
    };
  };
  var chain = next(interceptors)(options);
  return new InterceptingCall(chain);
}
_getUnaryInterceptor 由于篇幅较长,直接贴 GitHub 链接了:https://github.com/grpc/grpc-node/blob/grpc%401.24.x/packages/grpc-native-core/src/client_interceptors.js#L785
大致的逻辑就是我们通过 method_definition、channel 等参数来获取到一个 interceptor,并将其拼接到原有的 interceptor 后边,作为最后执行的拦截器, _buildChain 函数比较简单,就是实现了一个链式调用的函数,用来按顺序执行拦截器。
关于 interceptor 如何使用可以看我们介绍 interceptor 用法时写的 demo
主要的逻辑实际上在 _getUnaryInterceptor 中,我们会创建一个功能全面的 interceptor,函数会返回一个匿名函数,就是我们在上边代码中看到的调用 generator 的地方了,而在匿名函数的开头部门,我们就调用了 getCall 来获取一个 call 对象,这个 call 对象就是我们与 gRPC 服务器之间的通道了,请求最终是由 call 对象负责发送的。
getCall 中实际上调用了 channel 对象的 createCall 方法,这部分的逻辑也是在 c++ 中做的了,包含数据的发送之类的逻辑。
这是我们回到 makeUnaryRequest 函数,再看函数结束的地方调用的那三个方法,第一个 start,将我们的 metadata(可以理解为 header) 发送了过去,然后将真实的信息发送了过去,最后调用关闭方法。
我们可以在 _getUnaryInterceptor 中的 start、sendMessage 以及 halfClose 函数中都有调用 _startBatchIfReady 函数,而这个方法实际上就是调用的 channel 上的 startBatch 方法,再根据调用链查找,最终会看到处理逻辑在这里:https://github.com/grpc/grpc/blob/85e22ef28d55f27e8efb3d5e2e43ca6f59971065/src/core/lib/surface/call.cc#L1552
opType 与 代码中 switch-case 中的对应关系在这里: https://github.com/grpc/grpc-node/blob/grpc%401.24.x/packages/grpc-native-core/ext/node_grpc.cc#L72
首先在 start 里边主要是发送了 metadata,并且尝试接受服务端返回过来的 metadata,并在回调中触发我们传入的 listener 的 onReceiveMetadata 方法。
然后检查 response 的状态是否正确,并触发 listener 的 onReceiveStatus 方法。
接下来是调用 sendMessage 方法,在这里我们将消息体进行序列化,并发送,在回调中就会去调用我们传入的 callback。
最后在 halfClose 方法中其实就是发送一个指令来设置请求的结束。
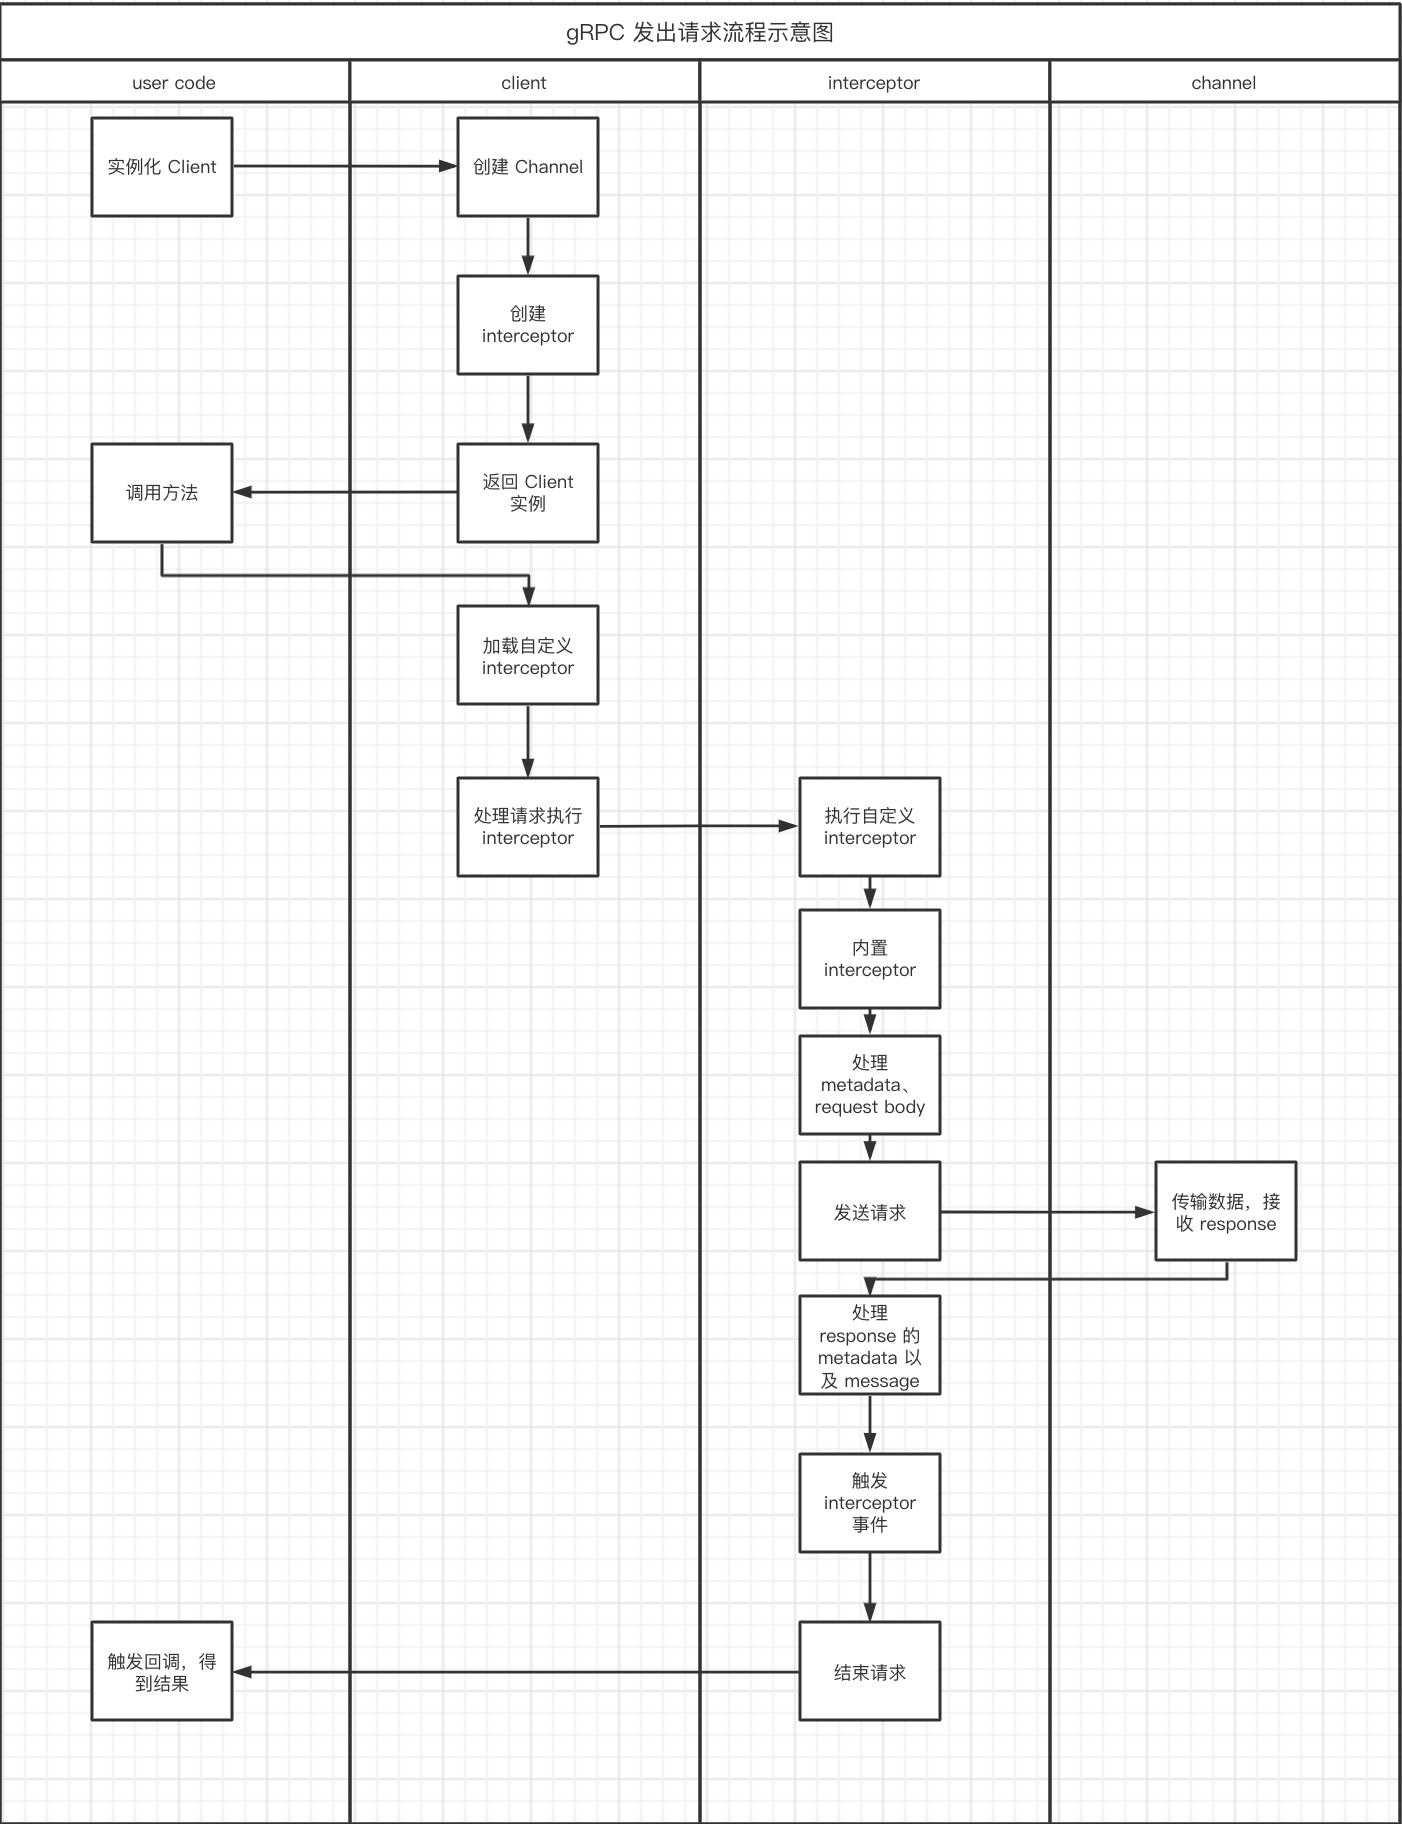
整个的流程细化以后大概是这个样子的:

小结
上边整体的记录就是关于 Client 这一侧是如何实现的了。
主要涉及到 Client 的构建、发送请求时做的事情、拦截器的作用。
而更深入的一些逻辑其实是在 c++ 版本的 gRPC 库里所实现,所以本次笔记并没有过多的涉及。
文章涉及到的部分示例代码仓库地址:https://github.com/Jiasm/grpc-example